To dial out to an Echolink node on my NORMAD EchoIRLP node, you need to preface the Echolink node number with an “#” on a DTMF pad or the letter “S” if using a command line.
GIMP is the linux replacement for Photoshop. I use it to crop pictures or adjust colors, nothing too fancy. Another great use is for making animated gifs.
Making an animated GIF using GIMP. Thank you NEoN Digital Arts for the help!
Select File Menu > Open as Layers > Select all images you want to be in the GIF > Open
In layers tab order your images > The GIF sequence will start with your bottom layer and run through each layer bottom to top. (I have only used two layers but you can use more)
Select Filters from main menu > Animation > Click Optimize for GIF
If needed, scale the images down to reduce final file size
To save GIF > Select File > click Export as
Name your GIF and choose folder > Select File Type > Click GIF Image
Select ‘As Animation’ > Select ‘Loop Forever’ To change speed between each image change the delay Click Export (50 works well, 100 is too slow)
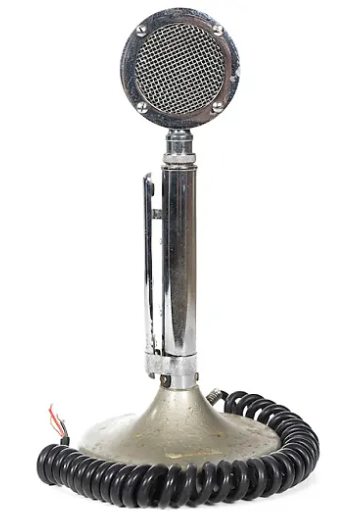
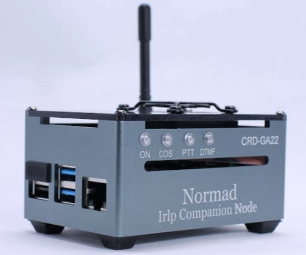
I recently upgraded my PiRLP node to a NORMAD node.
The PiRLP node provided EchoIRLP capability. With the node, I was able to use IRLP and Echolink. The PiRLP interfaced directly to my Kenwood TM-D710. I have been using the nodes from David Cameron, VE7LTD, for a number of years with only very small problems now and again.
Once I got my Davis Vantage Pro2 weather station up on APRS via the same TM-D710, I started experiencing problems with the audio output level of the PiRLP node. The big problem was that if I wanted to use the TM-D710 to get on the local repeater, I had to shut down the PiRLP node first. Not ideal.
Enter the NORMAD IRLP node. I first heard about the node on Jeff’s blog at KE9V.net. Like my node for Wires/Fusion, the NORMAD IRLP node has a small transceiver built into it. This is a great solution. It provides me the ability to dedicate my TM-D710 for weather APRS as well as also using it to monitor the local repeater without making any changes here in the hamshack.
The primary purpose of this blog is to act as a station notebook. A log that serves as a record as to what I am doing in the shack, how I configured certain items, how I overcame obstacles that were in front of me. Admittedly I have done a poor job at keeping up. And sometimes I do not realize or remember what I have placed in the log so it could assist me in the future.
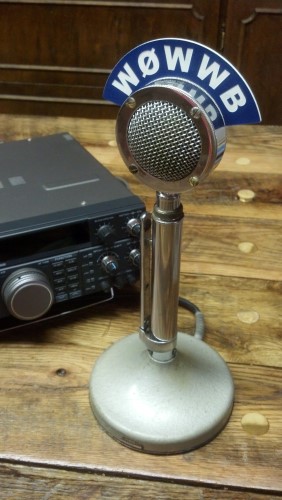
My configuration of the Normad for Echolink operations (in addition to its native IRLP ability) is a great example. I wished I had looked here first – it would have saved me about two hours. I received the Normad and swapped it out with my older PiIRLP. Got on to IRLP immediately. NOTE: here two great troubleshooting commands for trying to get Echolink working; killall tbd and tbd -ddd. The results provided by tbd -ddd show if your callsign and password are valid for the Echolink connection. A key place to start when Echolink is not working correctly.
I also enjoy using the Echolink functionality of EchoIRLP – mainly to listen to the Coffee Break net hosted by W6EK, the Sierra Foothills ARC every morning from 7:30am to 10am (Pacific).
If you are lucky, you have been involved in a truly great net at one point in your radio amateur career. The most memorable net for me was a 2m morning commute net back in Hampton Roads, Virginia. The participants were smart, well spoken, and directed the conversation to a number of topics which almost always focused on some aspect of amateur radio. In classic roundtable fashion, the conversation moved cleanly between those that checked in which allowed the focus to be on the conversation. Mark, N1LO, was one of the ringleaders. I miss those guys.
The Coffee Break Net is very similar. Check it out if you can. While the net does run on their terrestrial repeater (145.430 MHz -0.6 Offset PL Tone 162.2), you can join via AllStar (51018), Wires-X (W6EK-2M-ROOM (62545)), or Echolink (4128).
My interest in amateur radio and introduction to APRS also got me interested in maintaining a home weather station. When I lived back in Virginia, I first deployed a home weather station and took the steps of interfacing it with a 2m radio for use on APRS. I also attended National Weather Service weather spotter training… even had a card at one point with my weather spotter ID number. After the move to Kansas, I continued to keep a home weather station active and had a working webpage linked from the blog where one could see the latest weather data.
Pairing the Davis Vantage Pro2 weather station with a linux system was never straight forward. My previous linkage between weather station, computer, and radio had been Windows-based. UI-View32 was a sound and stable program. My desire to ditch Windows for linux acted as a strong influence to make the leap from UI-View32 to the linux-based Xastir, but the problem was with the Vantage Pro2’s data stream. As mentioned earlier, the good folks at Xastir finally created a work around using weewx to use the Vantage Pro2, Xastir, and my TM D710A to dependably beacon out my weather data.
But here is what I need to do… I need to capture all the steps of how to set everything up as well as mark all the references I used to gain eventual success. Documentation! I have mentioned before that this blog services as my station notebook and I think that is still a great idea – but it requires a bit more work on my end.
An example of a great reference that I found is a blog post entitled: New Weather Station – Davis Vantage Vue – Part 2 of 2: Linux installation. In addition to maintaining a link, I am also going to grab a copy of the post and save it as a pdf file as a backup reference. We know that information on the internet will not be here permanently.
The other reason that I need to capture these reference sites is that I have a habit of leaving tabs open on my browser. Before you know it, I have tab after tab – and I don’t want to close the tab because… well, that was sure interesting and possibly useful. The cure for my tab addiction is to lay it out here in the blog.
The NWS defines Partly Cloudy as “Between 3/8 and 5/8 of the sky is covered by clouds.” And Partly Sunny, “Between 3/8 and 5/8 of the sky is covered by clouds.” But here’s the trick, “The term “Partly Sunny” is used only during daylight hours.”
Mostly Sunny is “When the 1/8th to 2/8ths of the sky is covered by with opaque (not transparent) clouds same as Mostly Clear, except only applicable during daylight hours.” While Mostly Cloudy is “When the 6/8th to 7/8ths of the sky is covered by with opaque (not transparent) clouds. Same as Considerable Cloudiness.”
It sounds like the progression works as follows:
Mostly Clear or Mostly Sunny: 1/8th to 2/8th clouds Partly Cloudy or Partly Sunny: 3/8th to 5/8th clouds Mostly Cloudy: 6/8th to 7/8th Cloudy: 7/8th or more
I enjoy idiomatic expressions. One of my favorite, that I do not personally hear enough in day to day conversations is:
“a dog’s breakfast”
The Cambridge Dictionary defines the term as: something or someone that looks extremely messy, or something that is very badly done.
Equally interesting is where the term came from. The Phrase Finder says: This is a 19th century phrase. The origin is uncertain, although most of the earliest uses of it originate from England. An early example was printed in the London journal The Referee, November 1878 in a review of a play:
There is enough material for fourteen comedies crammed into its three acts, and the good things are flung together in a heap like a dog’s breakfast.
The allusion in this metaphorical expression is to the omnivorous nature of dogs and the messy variety of things they might eat given the opportunity. This is not to be confused with ‘ a dog’s dinner’ which has a related but significantly different meaning. [Dressed or displayed in an ostentatiously smart manner.]
Just goes to show that much can change between breakfast and dinner.
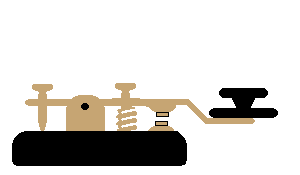
Here is the method I use to clean my J-38 keys. Some key collectors believe that keys should be left exactly as they are found, but considering the construction, materials, and ubiquity of J-38 keys, I think that carefully and gently cleaning them is appropriate. Do not, under any conditions use wire brushes or other highly abrasive methods.
1. Disassemble the key. Look carefully for, and set aside, the positioning pins in the binding posts (if they are loose) and all of the fiber washers. Put the bakelite and hard rubber parts in soapy water. Put the metal parts in ammonia. Let both soak overnight. Don’t panic, because some of the metal parts will turn black.
2. Carefully wash off the bakelite/rubber parts. If the two knobs are very dull I sometimes us black shoe polish on them. The bakelite you can carefully clean with Flitz (see below) if it is still dirty or discolored.
3. The metal parts I clean first with “Nevr-dull”. It is a “wadding polish” product that I get here in a hardware store, but I think it is also sold in boat stores, grocery stores, auto stores, etc. It is manufactured by The George Basch Co., Inc., Freeport, New York, 11520, USA.
4. Then I clean some of the larger metal parts with “Flitz”, which is a metal/fiberglass cleaner made in West Germany and packaged in the USA by Flitz International, Ltd., WI 53185. It is available in boat stores, and I buy it from West Marine on the internet (www.westmarine.com). Just get a very small tube of it–it goes a long way. Flitz protects the metal from corrosion.
The most important step is #1. The soaking makes a big difference!
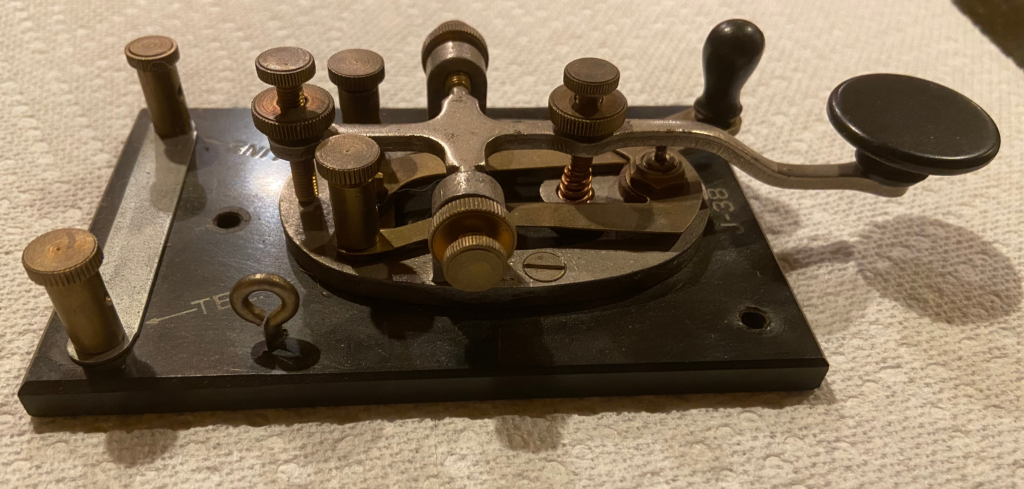
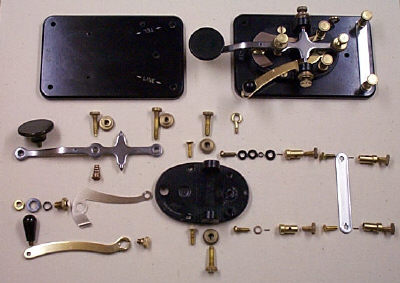
I have started the process of cleaning an ol’ J-38. Here is the before picture:
There is also some guidance (based on K6IX’s recommendations) from N2HTT’s website. Here is what he had to say:
Soak all the parts in household ammonia solution overnight. I collected the parts in groups, so I could figure out how they went back together. Also, I separated the white metal parts from the brass ones, not wanting any weird galvanic thing happening to them while soaking. I had visions of all the brass bits disappearing overnight or something like that. I have a bunch of these all-plastic ice cream jars (the family consumes a bunch of this stuff, good ice cream, great jars) that were ideal for the task. As Scott predicted, the white metal parts turned black overnight, but this is expected and not harmful.
Initial polish with Brasso. This removed the residue from the soaking.
Polish the parts again withFlitz Blue. You can find it on Amazon. This stuff is amazing. You can even use it on the painted parts, diluted.
This is my second effort at cleaning a J-38. The last one turned out pretty well and I gave it to a friend, encouraging them to give Morse code a try. This J-38 will be a loner to local hams aspiring to practice their straight key skills.
The parts have been soaking in an ammonia solution. This morning I realized I did not keep good track of where the rubber and cork washers went. Then I remembered I took step-by-step pictures of the last time I tore down a J-38… which I still have. These pictures clearly show where each part goes. Once I get all the parts clean on this key, I will reassemble, then take very good pictures with another disassembly to hopefully help anyone else looking for how to disassemble and reassemble a J-38.
K6IX has a picture of a disassembled J-38, but the image is a bit small.
… as you can see, there are a lot of small parts. (Image from K6IX)
 My interest in amateur radio and introduction to APRS also got me interested in maintaining a home weather station. When I lived back in Virginia, I