Update on the v5.0.1 update kerfuffle
Amateur Radio – a hobby where people talk about their hobby using their hobby.
Once again I am plagued by a failure to document problems I encountered and figured out.

Devoted a good portion of yesterday to getting weewx back into operation after a version upgrade took it down.
Part of that involved me figuring out (again) how to get the weewx extension working that creates the wxnow.txt file that Xastir uses to create and send APRS weather data.
Here’s an example of what Xastir was sending out:
APX219,TNGNXI,WIDE2*,qAR,BASHOR:@071408z3913.63N/09454.49W_166/006g012t051r000P000p000h05b10180
The error is “h05” as humidity is not 5%. The problem is that Xastir wants a two digit humidity data value and wxcn is sending a three digit value.
In examining the old copy of wxcn.py I see the comments I placed in the file:
# fields.append(“h%03d” % int(data[‘outHumidity’]))
# changing value “h%03d” to “h%02d”
… and the line now appears as:
fields.append(“h%02d” % int(data[‘outHumidity’]))
I updated these comments in the new version of this file as it appears in /home/weewx/bin/user/cwxn.py
With the correction, here is what Xastir is now beaconing:
APX219,WIDE2-1,qAR,BASHOR:@071426z3913.63N/09454.49W_166/007g011t051r000P000p000h59b10172
Now the humidity is given as “h59” instead of “h05”.
I am pretty sure that this concludes all the tweaks and fixes I had to make to get weewx working with Xastir to work properly. Time will tell.
A break down of the Xastir/APRS weather data string:
@071426z3913.63N/09454.49W_166/007g011t051r000P000p000h59b10172
@071426z – “07” is the calendar day, “1426z” is the time
3913.63N/09454.49W – location
166 – wind direction
007 – wind speed
g011 – gust, peak winds in last five minutes
t051 – temperature
r000 – rain within last 60 minutes
P000 – rain within last 24 hours since midnight
p000 – rain per last 24 hours (sliding 24 hour window)
h59 – humidity
b10172 – barometric pressure
I started to prepare for the 0700 Kansas 80m weather net (3920 KHz, 1300-1330Z) this morning and discovered that weewx had stopped pulling in weather data after an update the previous evening.
When weewx upgraded to v5.0.1 and the bottom fell out. Checking the weewx users group, many were having the same problem.
The consensus was to go back to v4.10.2 – if that was reinstalled, everything would work as normal. Not the case for me.
Here is what did work:
sudo apt remove weewx
I then created a folder under /home called weewx. I then moved weewx-4.10.0.tar.gz into the weewx folder. And installed it, knowing I had already met the prerequisites.
sudo python3 ./setup.py build
sudo python3 ./setup.py install
The next direction given is: wee_extension –install weewx-cwxn.zip
… the problem is that linux does not know where to look for wee_extension
What worked… I found advice that said: try specifying the full path to wee_extension
sudo /home/weewx/bin/wee_extension –install weewx.cwxn.zip
[CumulusWXNow]
filename = /var/tmp/wxnow.txt
… there is also an addition made in the section above that I could identify by comparing old and new weewx.conf files.
Just in case, the commands for completely removing weewx:
sudo apt purge weewx
sudo rm -r /var/www/html/weewx
sudo rm -r /var/lib/weewx
sudo rm -r /etc/weewx
sudo rm /etc/default/weewx
sudo userdel weewx
sudo gpasswd -d $USER weewx
sudo groupdel weewx
This link includes an example of installing an extension. This may be useful and worth a look.
Rebooting and seeing if everything will work:
sudo tail -f /var/log/syslog
– this should show weewx sending wx data to Wunderground
cd /usr/local/share/xastir/scripts then sudo ./wxnowsrv.pl /var/tmp/wxnow.txt 60 5500
checked wxnow.txt and it is being updated
xastir &
From Xastir’s menu: View/Incoming Data
Interface/Interface Control
With both started, incoming data should be coming across the Display Packet Data window.
From Xastir’s menu: Interface/Transmit Now! : check aprs.fi if a valid and accurate packet has been sent.
Check back with aprs.fi in 15 minutes to see if another packet has been sent.
Check Weather Underground to see if data is up to date.
Was having difficulty printing to my stalwart HP LaserJet P2055dn on my Mac mini (macOS 14.1.1).

Printing from a PDF file using either Adobe Acrobat or the preview application would bring the first page but them spooling would stop at ~9%.
When I double checked the drivers selected for the printer, they seemed to be generic. Troubling, as this printer has always worked near flawlessly with my linux installations on other platforms. My old Mac Book also worked ok as long as I printed directly from the file.
I found that I needed to install HP 5.1.1 Printer Software Update. https://support.apple.com/kb/DL1888
With this update the Mac mini immediately identified the printer and installed the appropriate drivers. Printing works, but spooling seems a bit slower than normal.
I am a fan of the LaserJet P2055dn. I have been using the printer for about 15 years and it has served my as both an elementary classroom teacher as well as through three graduate degrees worth of readings. The printer does not chug toner and the duplex function helps me save paper. Accepting a network connection, I can print from anywhere in the house. Always impressed by the early HP LaserJet printers, this one does not disappoint.
To dial out to an Echolink node on my NORMAD EchoIRLP node, you need to preface the Echolink node number with an “#” on a DTMF pad or the letter “S” if using a command line.
Example: when connecting to the Sierra Foothills Amateur Radio Club (W6EK) repeater’s Echolink connection for their Coffee Break Net:
Dial “#4128” on the HTs DTMF pad or …
Type “decode S4128” to connect via command line.

From K6IX’s website:
Here is the method I use to clean my J-38 keys. Some key collectors believe that keys should be left exactly as they are found, but considering the construction, materials, and ubiquity of J-38 keys, I think that carefully and gently cleaning them is appropriate. Do not, under any conditions use wire brushes or other highly abrasive methods.
1. Disassemble the key. Look carefully for, and set aside, the positioning pins in the binding posts (if they are loose) and all of the fiber washers. Put the bakelite and hard rubber parts in soapy water. Put the metal parts in ammonia. Let both soak overnight. Don’t panic, because some of the metal parts will turn black.
2. Carefully wash off the bakelite/rubber parts. If the two knobs are very dull I sometimes us black shoe polish on them. The bakelite you can carefully clean with Flitz (see below) if it is still dirty or discolored.
3. The metal parts I clean first with “Nevr-dull”. It is a “wadding polish” product that I get here in a hardware store, but I think it is also sold in boat stores, grocery stores, auto stores, etc. It is manufactured by The George Basch Co., Inc., Freeport, New York, 11520, USA.
4. Then I clean some of the larger metal parts with “Flitz”, which is a metal/fiberglass cleaner made in West Germany and packaged in the USA by Flitz International, Ltd., WI 53185. It is available in boat stores, and I buy it from West Marine on the internet (www.westmarine.com). Just get a very small tube of it–it goes a long way. Flitz protects the metal from corrosion.
The most important step is #1. The soaking makes a big difference!
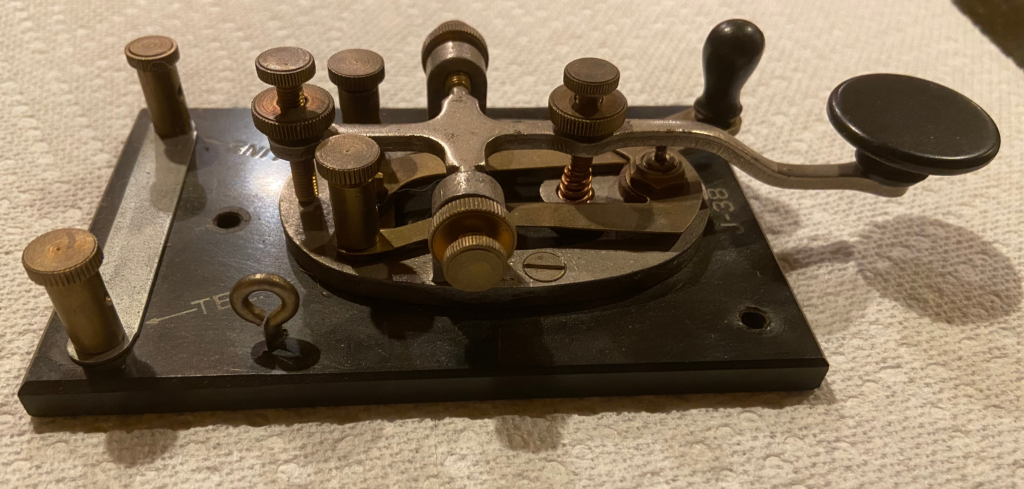
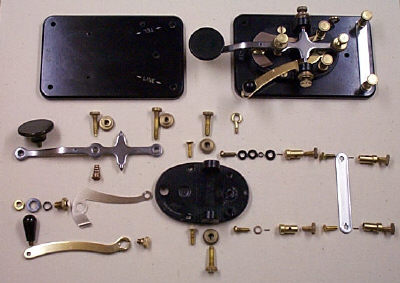
I have started the process of cleaning an ol’ J-38. Here is the before picture:
There is also some guidance (based on K6IX’s recommendations) from N2HTT’s website. Here is what he had to say:
Soak all the parts in household ammonia solution overnight. I collected the parts in groups, so I could figure out how they went back together. Also, I separated the white metal parts from the brass ones, not wanting any weird galvanic thing happening to them while soaking. I had visions of all the brass bits disappearing overnight or something like that. I have a bunch of these all-plastic ice cream jars (the family consumes a bunch of this stuff, good ice cream, great jars) that were ideal for the task. As Scott predicted, the white metal parts turned black overnight, but this is expected and not harmful.
Initial polish with Brasso. This removed the residue from the soaking.
Polish the parts again with Flitz Blue. You can find it on Amazon. This stuff is amazing. You can even use it on the painted parts, diluted.
+-+-+-+-+-+-+-+-+-+-+-+-+-+-+-+-+-+-+-+-+-+-+-+-+-+-+-+-+-
This is my second effort at cleaning a J-38. The last one turned out pretty well and I gave it to a friend, encouraging them to give Morse code a try. This J-38 will be a loner to local hams aspiring to practice their straight key skills.
The parts have been soaking in an ammonia solution. This morning I realized I did not keep good track of where the rubber and cork washers went. Then I remembered I took step-by-step pictures of the last time I tore down a J-38… which I still have. These pictures clearly show where each part goes. Once I get all the parts clean on this key, I will reassemble, then take very good pictures with another disassembly to hopefully help anyone else looking for how to disassemble and reassemble a J-38.
K6IX has a picture of a disassembled J-38, but the image is a bit small.
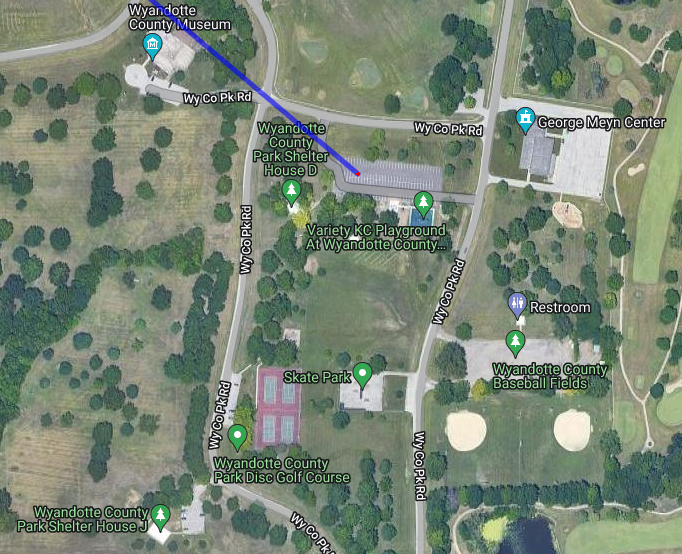
About twice a month I have the opportunity to scoot out in the morning to a nearby park for an hour or two. I use it as an opportunity to make a few contacts to make sure my mobile setup is still working well. This morning I was out at the Wyandotte County Park.
I was able to make five contacts on 40M. Some interference form shortwave broadcasts, but nothing that fully prevented a QSO. I enjoy using the J-45 leg key – it does not seem like it is a key built for speed. That’s okay for me as I am still somewhere in between 10 and 15 wpm.
When I get home and upload these contacts on to LOTW, I want to make sure that I have the correct location in TrustedQSL before I sign and upload the logs. I found two websites that helped me figure out the grid location for the park. The first is QRZ’s Gridmapper. The second website was a bit more user friendly and also provided the ITU and CQ Zones. After I set up a new station location in TrustedQSL and had transferred the contacts from my pocket notebook to my fldigi logbook, I exported the contacts and then signed and uploaded them via TrustedQSL into LOTW. Victory.
It is getting close to the time to order some QSL cards. My go to provider is Randy Dorman of KB3IFH QSL Cards. He does a great job making sure the card appears as you want it as well as printing on high quality stock.
It’s the final courtesy!
Last summer when we were camping in the national parks, there were many campsites where we had no cell phone service. I am not complaining about that, but our work around to communicate back home to the XYL often required a trip to the pay phone (sometimes hard to find). I thought about perhaps using APRS’s capability of relaying short pieces of text as emails. Part of the problem is that there are many areas of the parks that don’t have any APRS digipeater coverage (Glacier and Yellowstone National Parks for example). How to get a message through?
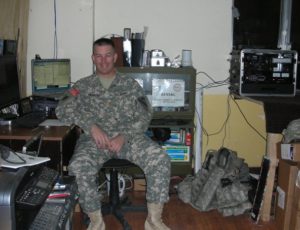
Then I remembered my MARS station (AEN5AC) in Iraq. I was using an ICOM IC-7000 and an SCS PTC-IIusb modem to pass MARSGRAMS from my location north of Baghdad to another station at the US embassy in Qatar. The pairing worked quite well and I was consistently able to connect and pass traffic using PACTOR 3 at the 1400 baud rate. Could I use a similar setup to provide an HF email option while camping this summer?
I dug out my SCS PTC-IIusb modem. I had not used it since shutting down the MARS station in June of 2008. Everything was still in the box. To include the cables necessary to interface the modem with an ICOM IC-706MKIIG… the same rig I use for HF mobile.
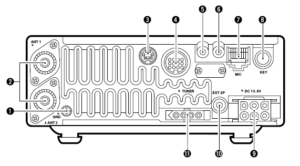
I pulled out my spare IC-706MKIIG. Coming back to Kansas from Field Day in California back in 2009, my IC-706MKIIG quit on me. I ended up buying a second at the HRO in Denver and sent the broke one to ICOM. ICOM fixed it and returned it. I kept it in the box and it went back on the shelf. I did order a 6 pin Molex connector with powerpoles to allow for an easy power connection (#9). I connected the two cables from the modem to the rig. Once cable is for the data and plugs into the 706’s 13 pin accessory connection (#4). The other cable connects to the 706’s CI-V interface (#6) to have the radio change frequencies based on what station is being contacted.
I had the basic hardware of a HF email station, except for a computer. I would need one that would function out of the vehicle. This would probably require a laptop. I also decided for the ease of simplicity that the computer should be Windows driven (instead of Linux). Gasp! The bottom line is that the software and drivers required to send email via HF and use the SCS PTC-IIusb modem is Windows based. The answer ended up being an Dell XPS 15.

Using a Windows based computer helped me with a number of summer travel tasks that could not be accomplished by my small Linux laptop:
(1) Run the software required for HF email (more on Winlink and Airmail later)
(2) Run ARRL’s TravelPlus for Repeaters
(3) Run RT Systems radio programming software for my TM-D710A
(4) Run RT Systems radio programming software for my VX-8RGs
(5) Read the SD card from my Canon digital camera
Interestingly enough, the new laptop does not have a CD/DVD drive nor an RJ-45 connection for a LAN cable. Neither of these have been a show stopper yet.
ARRL’s TravelPlus for Repeaters
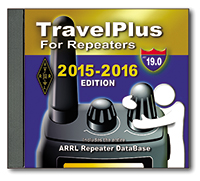 I had purchased TravelPlus for Repeaters with the intent of installing it on my existing Linux laptop and running it under a VirtualBox Windows session (similar to how I run iTunes on my Linux laptop). However the software failed to install. I tried troubleshooting and looking at suggested fixes found on the forum sites but still had no luck. I tried installing TravelPlus using WINE. It installed but would not run as well.
Dell XPS 15 to the rescue. As the laptop does not have a CD/DVD drive, I copied the drive onto network storage. I then was able to install TravelPlus over the network and it is working without issue.
RT Systems Programming Software
The RT Systems programming software works fine under a VirtualBox Windows session. As I was moving all my vehicle related radio/computer tasks to the new Windows laptop, I attempted to install the programming software for the TM-D710A (used for beaconing the location of my vehicle and talking on VHF/UHF). Following a similar procedure that worked for TravelPlus, I copied the programming software from the install disks to a network drive. The software installation for the TM-D710A worked without a hitch. The software for the VX-8RGs (HTs we use for around camp and hiking) failed to load. The error said that I must use the original disk to install. A big challenge when the laptop doesn’t have a CD/DVD drive. The work around is that you find another Windows computer with a CD drive, load the software CD, then back on the driveless laptop, map the CD drive (like you would map a network drive). That worked and I was able to install the programing software for the VX-8GR.
HF Email Software
There are two main choices for software to allow for HF email: RMS Express and Airmail. I installed both. Airmail was the same program I used in Iraq and it offered easy configuration with the IC-706MKIIG and the SCS PTC-IIusb.
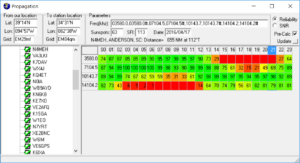
I now had all my equipment for a test run setup in my basement hamshack: spare IC-706MKIIG, SCS PTC-IIusb, and the Dell XPS 15 with Airmail. I connected the IC-706MKIIG to my Elecraft tuner and used my existing G5RV antenna. Airmail configures easily. The software has a list of stations offering mailbox services that can be viewed on a propagation chart by frequency and distance. Based on time of day, I selected a station in Texas that offered a 40M PACTOR 3 connection. Airmail allows me to click on the frequency in the propagation chart which then changes the dial frequency of the radio. After listening to see if there were any ongoing connections, I initiated contact. The modem lights flashed and the rig clicked between transmit and receive. The connection was made and I was able to send a test email as well as a position report.
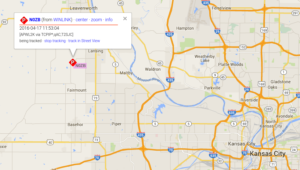
Success! The position reports that go into the Winlink system are copied over into APRS. Now, even if I am not able to reach a digipeater with my VHF APRS beacon, I can send a position report over HF to let the XYL know where we are.
I then thought about the steps I would have to take of transitioning my IC-706MKIIG configured for HF mobile to be ready to work with the PTC-IIusb to send email. As the remote head is located up near the drivers seat, this would present problems with being able to observe the modem, laptop, and radio control head all at the same time.
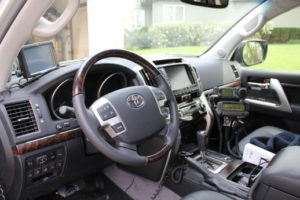
What if I just dedicated the spare IC-706MKIIG rig to the task of HF email? It would save me time and bother in pulling and plugging cables. It would also give the camping option of being able to operate HF from outside the vehicle.
Using an additional iPortable box, I rack mounted the spare IC-706MKIIG and the SCS PTC-IIusb. Now I will have a spare HF rig with me, so if one goes out I will still be operational. I also attached the Tarheel screwdriver antenna’s rocker switch to raise and lower the antenna on the side of the box. During normal HF mobile operations, the TurboTuner (connected to the other IC-706’s tuner connection and CI-V connection) manages achieving a correct match between the operating frequency and the screwdriver antenna.
I only have the one TurboTuner. The TurboTuner requires a connection to the CI-V. So does the SCS PTC-IIusb. My solution was to leave the TurboTuner alone. Instead, using the rocker switch, I can manually tune the antenna while visually observing the 706’s SWR meter.

To transition between using the 706 dedicated to HF mobile to the 706 now dedicated to HF email, I have to do the following:
(1) disconnect the antenna feedline from the TurboTuner
(2) disconnect the control line that goes from the TurboTuner to the Tarheel screwdriver antenna
(3) connect the antenna feedline directly to the HF email 706
(4) connect the control line to the rocker switch
(5) connect the laptop to the SCS PTC-IIusb via a USB cable
(6) connect the iPortable’s powerpole connection to the junction box in the back of the vehicle
… then I am ready to go. The iPortable box rests nicely on the vehicle’s tailgate, next to the laptop. All at about lawn chair height. Not only can I use this setup to send email via HF, but I can also use it for causal National Parks On The Air contacts as well.
What’s left to do:
(1) Constant cooling fan modification for both IC-706s (see AD5X’s article)
(2) An extended control cable for the Tarheel screwdriver antenna. This will allow me to further remote away from the vehicle, but still use the antenna.
(3) A length of antenna feedline for remoting.
(4) A length of powerpole-ready powerline to attach to either the travel trailer battery or directly to the spare vehicle battery… again for remoting away from the vehicle.
(5) I have a set of Heil headsets that worked with my IC-7000. I think if I get the AD-1ICM, I should be able to use them with the 706.
(6) A Heil HS-2 hand PTT switch to use with the headset.
Once I knew that I had a new callsign, I sat down a wrote down a list of what I needed to do…
(1) QRZ.com website. When my callsign changed a few years back from AD7MI to NI0L, I jumped on the air to “test it out”. On 20m, I was having a PSK31 QSO when the distant party thought I was a pirate station because on QRZ.com my new callsign did not reflect the name and QTH I was using. A pirate! I explained that it was a new callsign but I could tell that the other guy was not buying it.
I thought I would need to go on to QRZ.com and register as a new user. I made a posting in the QRZ.com forum category dedicated to callsign problems. The end result: just wait… the change will take place automatically in a few days.
And that is the case. If you are a US ham and change your callsign, just wait. Within two or three days the callsign change will be reflected on QRZ.com. If you get on the air before QRZ.com is updated, be prepared for people to think you are a pirate.

(2) Log of The World. Easy to do. Just submit for a new certificate under the new callsign. ARRL usually responds within one working day.
(3) EchoIRLP node. This ended up being much easier than I thought it would be.
a. To change your callsign in the IRLP database, go to this webpage using a computer connected to the same router as the IRLP node.
b. Go into your node and edit irlp/custom/environment file to change the old callsign to the new callsign. Restart the node and verify the changes have taken effect.
c. For the EchoLink side:
– Validate your new callsign.
– Check for validation of the new EchoLink call sign / node number on EchoLink using the EchoLink PC client software. Remember, EchoIRLP only allows link (-L) or repeater (-R) nodes.
– Note: you can only register the new callsign once the EchoLink folks of pulled the latest and greatest database update from the FCC. This may take a day or two. Once that is done, you can validate your new callsign. Your new callsign will be assigned a new EchoLink node number. If you want to use your previous node number, EchoLink allows you to swap node numbers between your old callsign and your new callsign.
– Once you are validated and have swapped node numbers edit the files and settings listed below:
/home/EchoIRLP/ custom/tbd. conf
ConferenceCall =
ConferencePass =
/home/EchoIRLP/ custom/echo_ environment
export ECHO_MYCALL=
/home/EchoIRLP/ custom/userdata. txt
Restart IRLP from root login with script /home/irlp/custom/ rc.irlp, or reboot the node.
IRLP node 4433 and EchoLink node 536398 are up and operational.
(4) APRS – change the callsign in my vehicle, HTs, and UI-View32. Pretty straight forward. The home weather station info can now be found here.
(5) Change the blog website. I have been keeping an amateur radio blog for about 10 years now. Web hosting companies make it pretty easy to get a domain for your website and then setup web hosting. I like using WordPress to setup and maintain the actual blog. Fairly straight forward but flexible to do just about anything you would want for a amateur radio blog. The new website is up and running.
(6) Callsign license plate. Kansas makes the pretty simple. I went down to my county office on Friday after work. The application process was smooth and the wait should be about 4-6 weeks.
(7) New QSL card. I am thinking of going with this:
