The project is complete. For a long time I have wanted to replace my hamshack desk. The now retired desk was a product of my previous basement hamshack when we lived in Leavenworth. In that house the entire basement was unfinished and there was room (… so much room) to spread out. In that location the first thing I built was a workshop bench. I am no carpenter, but I can follow directions. Construction of the workbench went well so I used the basic design of that workbench to be used as a massive ham desk. 96 inches long and 42 inches deep, the table was mounted on casters which allowed me to move it around easily. Carriage bolts were used to hold the legs to the tabletop and studs under the tabletop provide a degree of stability. All that space was a serious luxury that gave me plenty of room to spread out equipment.
When we moved to the current location I simply took the table apart and rebuilt it inside the new hamshack. In this house the basement is finished other than one room – the hamshack. Nowhere near as spacious as before. I didn’t think too much about the size, just put the table into the corner, taking up just about one whole side of the room.
And it “worked” for the last ten years. Despite the casters on the legs for mobility, it was near impossible to really pull the table away from the wall and get behind it to adjust cables or change out equipment. I was also using the desk as my primary workspace for non-ham related activities.
I think it has almost been the last three years that I have wanted to build a new ham desk. I started brainstorming what features I wanted in a new desk.
- casters to let me move it easily.
- smaller. I have always read in discussions of hamshack desks that depth is a true benefit, the deeper the better. I’m not sure. At a certain point it is difficult to reach across the desk to make an adjustment. 36 inches seems to be plenty deep but allows me to get all the way across to the back side from the front.
- I have a networked laser printer that does duplex printing. It is positioned on a shelf in the corner of the room above the ham desk. Not fancy (15 years old) but is a great workhorse. I have to do a lot of reading and enjoy reading a hard copy; therefore there is printing. The big long desk made it very difficult to get to the printer. If the table was shorter in length, I could more easily get to the printer.
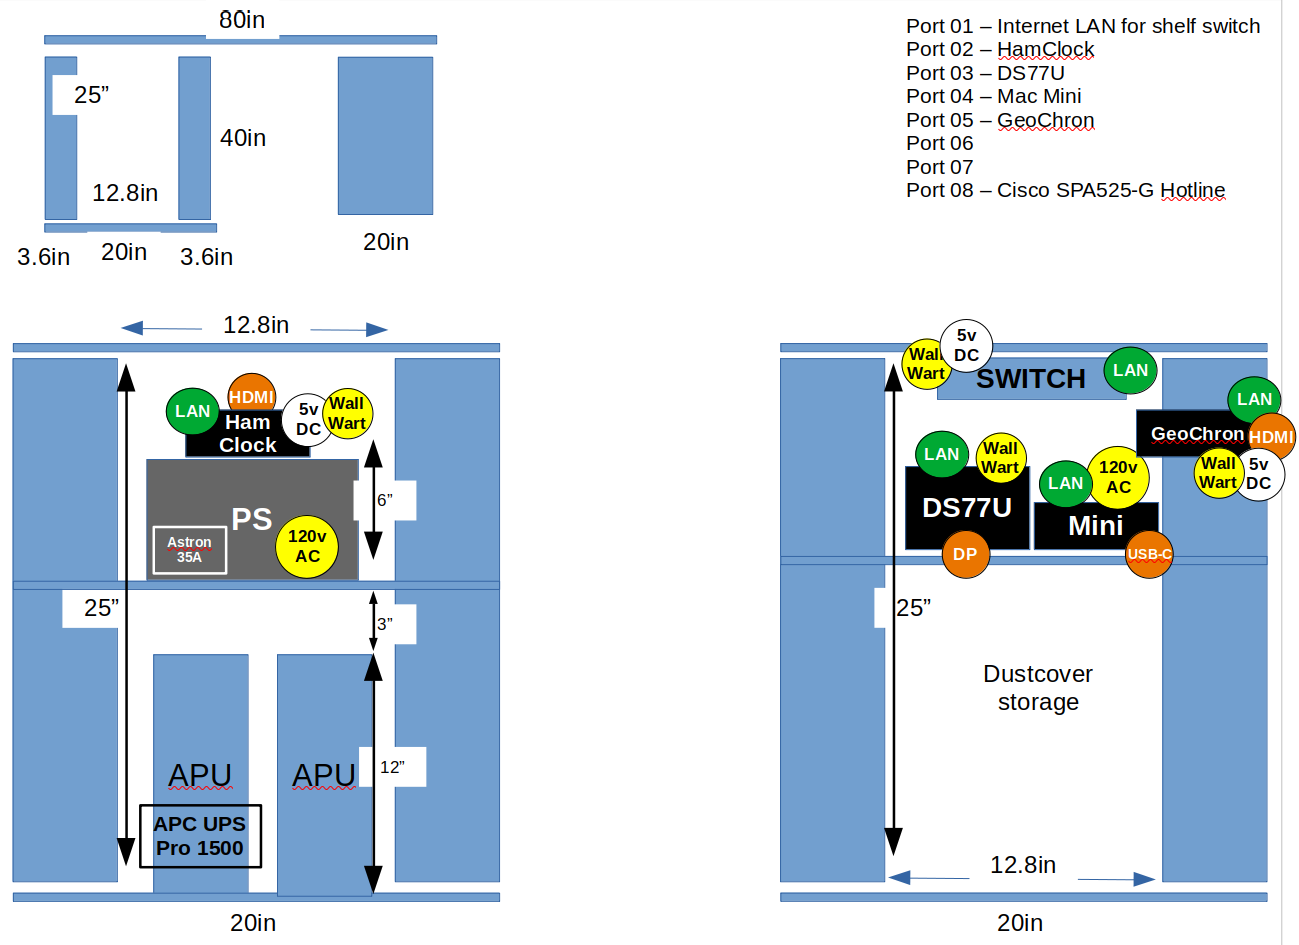
- under-the-tabletop shelves. I use an UPS for my equipment. The old desk (without under-the-tabletop shelves) had the UPS sitting beneath the desk on the carpet in the corner. Problem: when I wanted to move the desk, I had to unplug the UPS and move it out. With under-the-tabletop shelving I could place the UPS on a shelf and move it along with the desk. Shelves also gave me the ability to move the Astron power supply off the main table, as well as the ham computer.
- Doing non-ham computer work, I wanted a second computer. A Mac Mini was the solution. Under-the-tabletop shelves would let me keep that off the top.
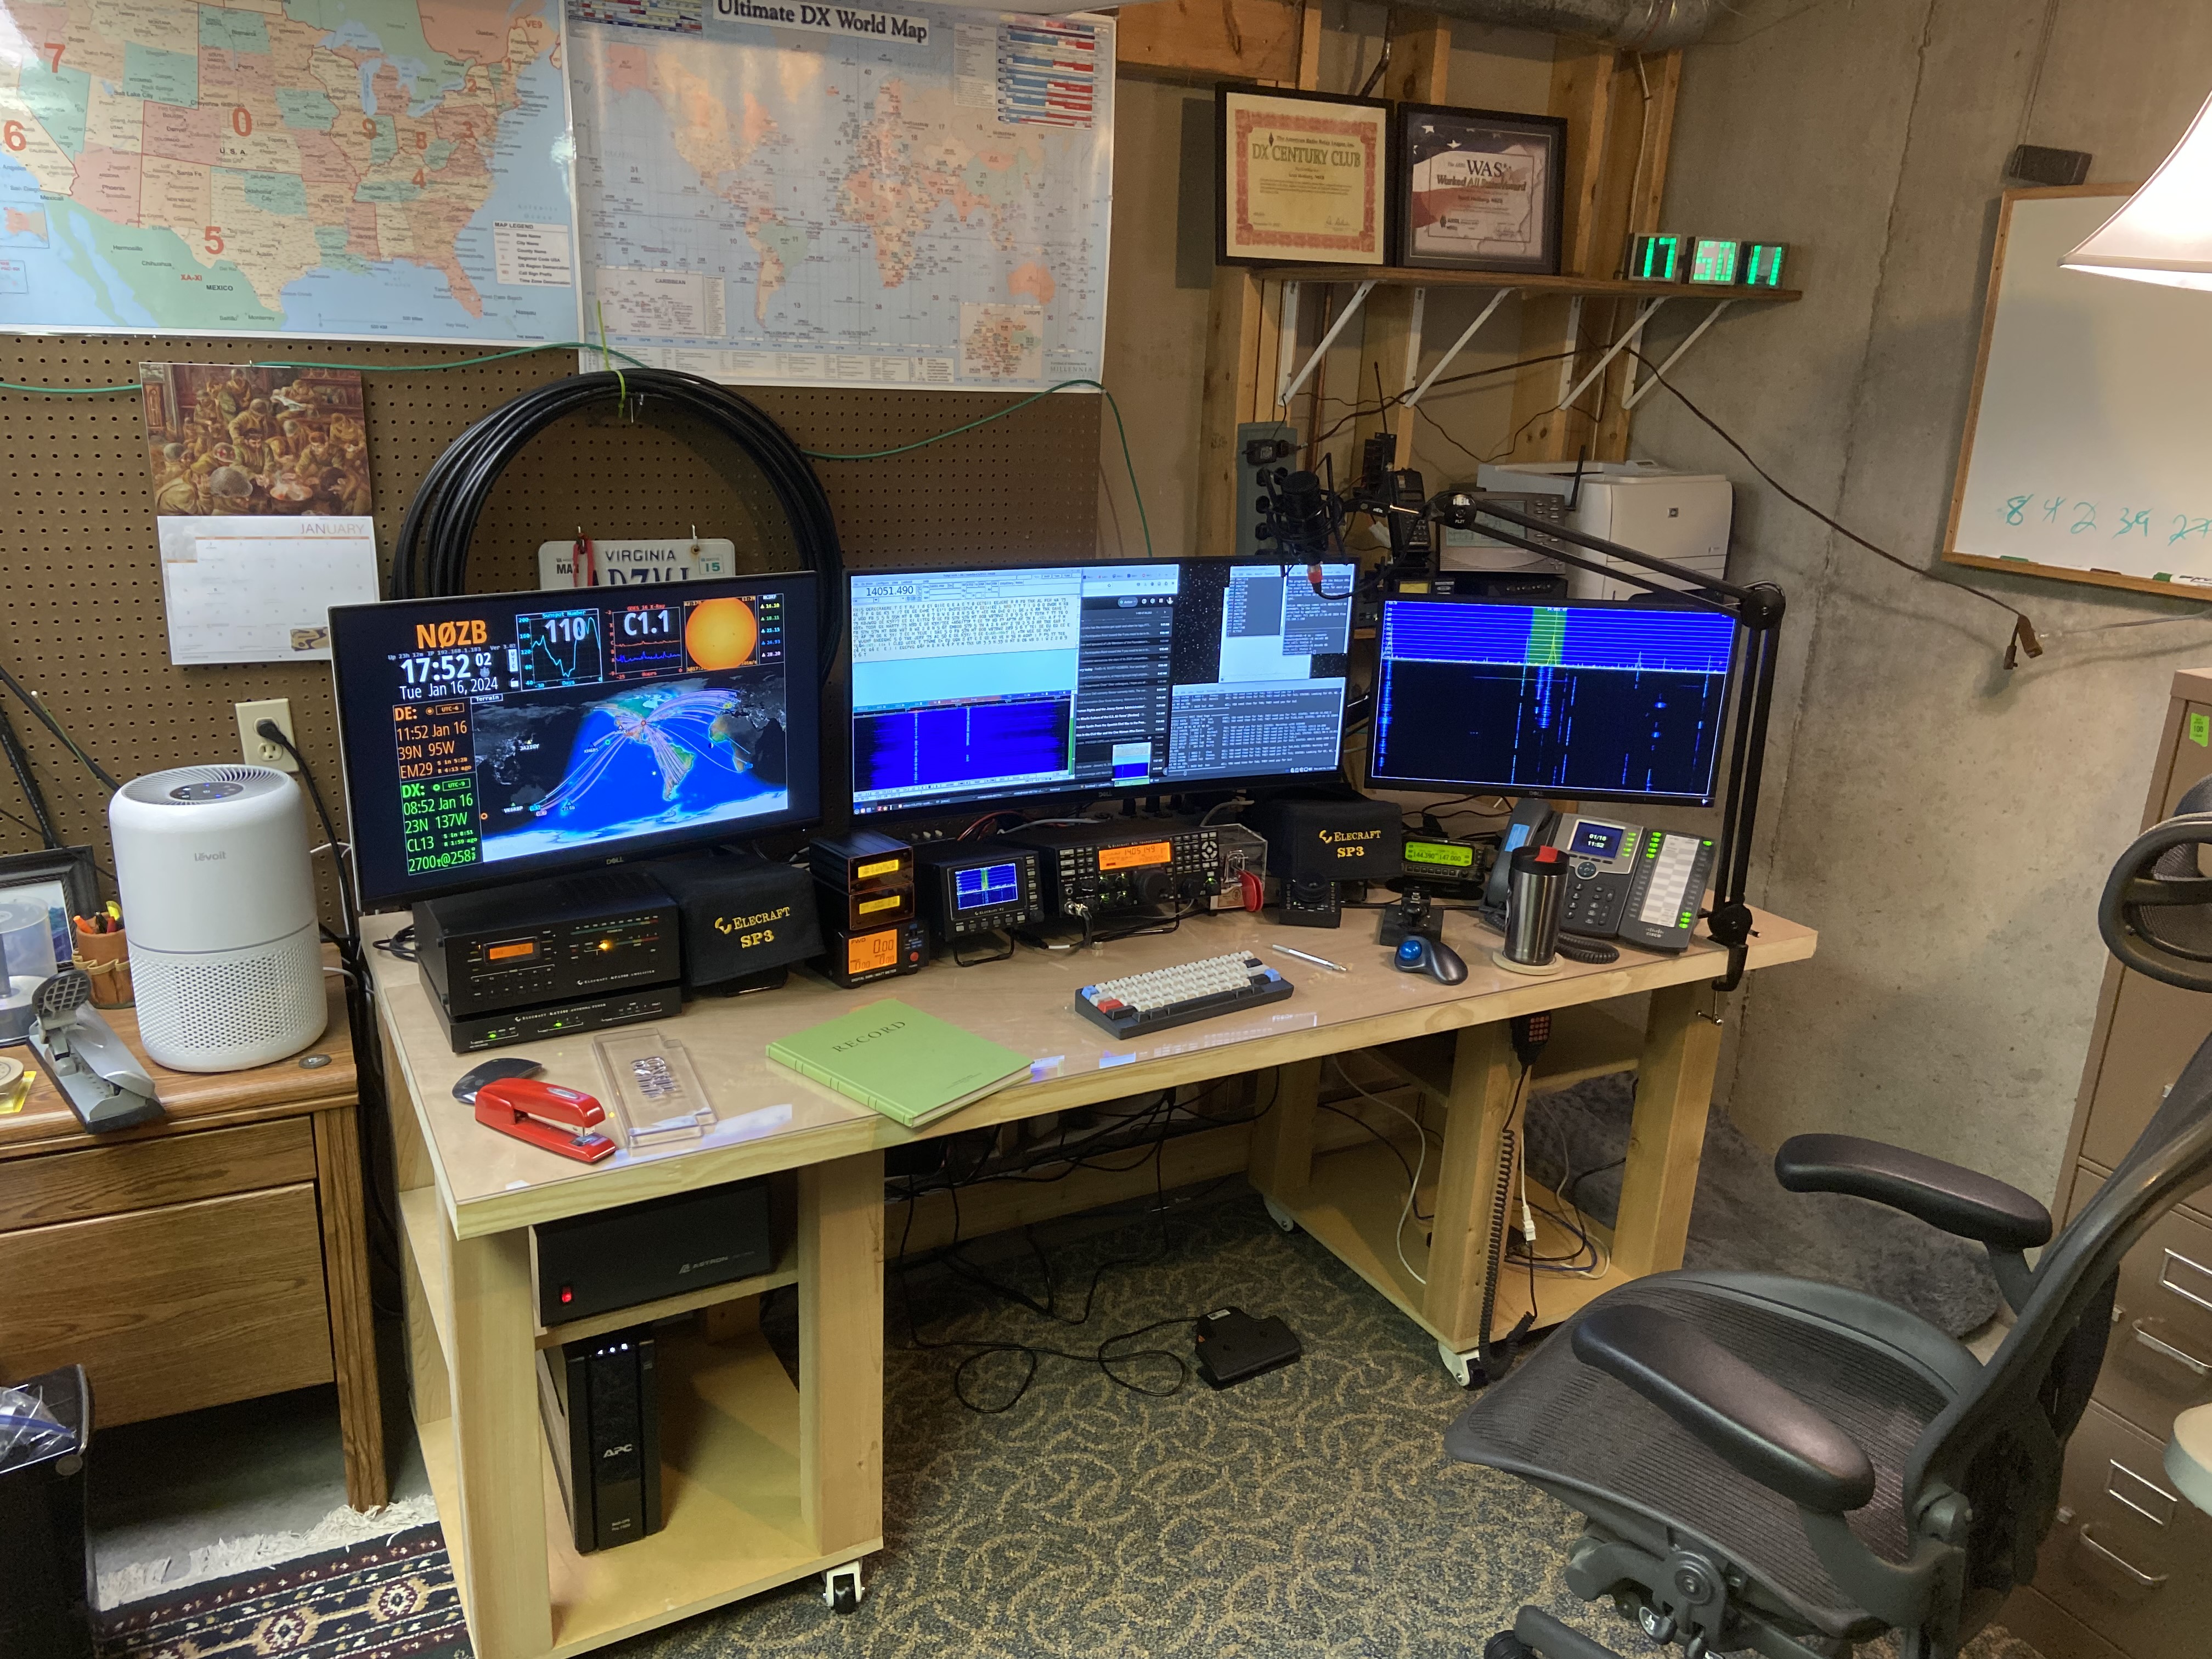
- for monitors, I had two nice sized monitors that were mounted on arms that allowed me to positioned them above the radio equipment. I had a third, large 34 inch Dell monitor that was not being actively used. I wanted this to be my center monitor. The Dell 34 can take three connections: HDMI, DisplayPort, and USB-C/Thunderbolt. My ham computer has a DisplayPort and two HDMI outputs. The Mac Mini can do HDMI or USB-C/Thunderbolt.
- a monitor for my Elecraft Panadapter output. I enjoy having the panadapter and had it attached to a monitor that sat on a shelf behind the desk that was hard to see… just not optimal.
- a monitor showing HamClock or GeoChron. Having such a display would be helpful, providing important information available at a quick glance.
- cable pass thrus and cable management.
- ability to keep APRS computer and TM-D710A going if the power goes down. Possible later option for a battery backup redundant to the UPS.
- adequate table depth to comfortably use a straight key.
- a stable desktop that can handle my straight key bashing.
- a place to conveniently stash my equipment covers.
- room in front of the radios for non-radio work (reading and writing).
I spent many an evening looking around the internet for ham desk ideas. I did consider some type of IKEA solution. Nothing looked like it would be an ideal solution. What did catch my eye was hams that had used doors as a tabletop. I decided to go with a solid core door: 80 inches by 36 inches. I wanted the tabletop height to be 31 inches and then did the math based on the height of the casters, the 1.75 inch thick door, and the other elements involved in building desk supports on either end.
The two desk supports would be 20 inches wide and 24 inches deep. I would place one on the far end of both ends, centering it under the door (desktop) providing six inches of desk overhang on front and back. This would give me 34 inches of space to move around in my chair in the middle of the desk.
I built the desk supports first using 4x 4x4s separating a bottom and top (20 inches by 24 inches). I then attached the casters. Felt nice and stable.
Then I got the door which ended up being almost 80lbs – pretty darn heavy. Placing the door on the desk supports, it moved around nicely with the casters. I then put in four cable pass thru holes in the door and mounted the three monitor arms.
It was time to move the old desk out and the new desk in. I carefully disconnected all the radio gear and moved it out. Then I disassembled the old desk and moved it out, piece by piece.
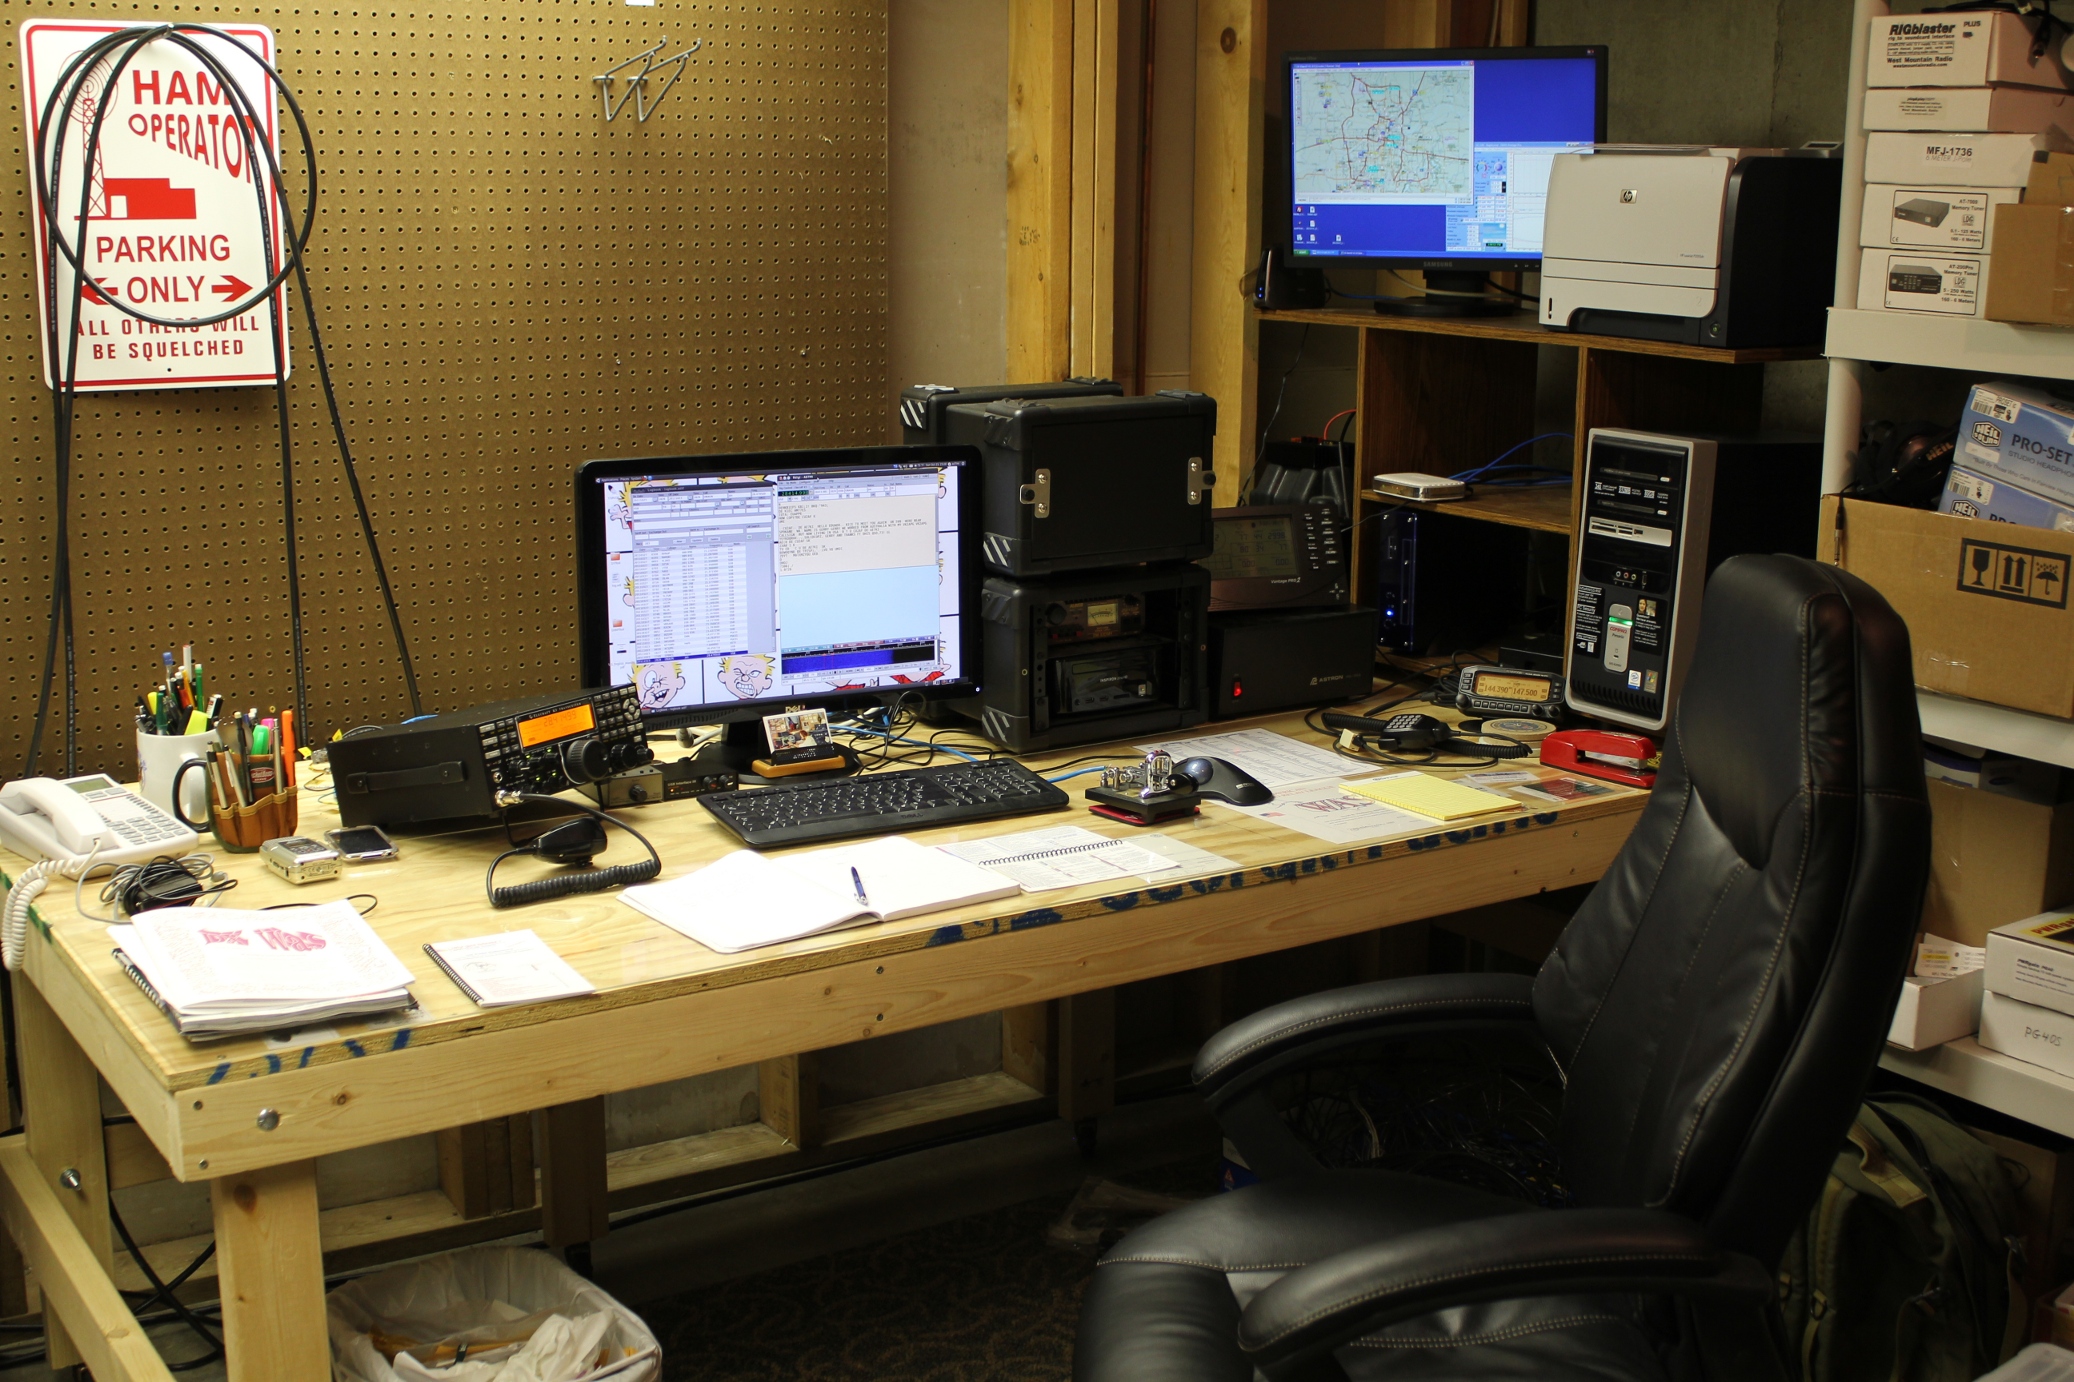
With the humongous desk now out of the way, I worked on the shelf area in the back corner that had been mostly blocked by the desk. I moved up the small linux computer that I used for running Xastir in support of an an APRS WX station (a Shuttle XC60J, Celeron-based with 8GB of memory). The station puts out an APRS weather beacon on 144.39 MHz every 15 minutes. On top of the computer I placed the Davis Vantage Pro2 weather display panel. Sitting at the desk, I should be able to see the weather data for use with QSOs.
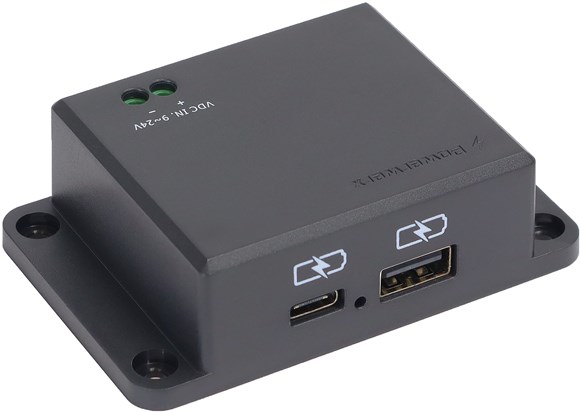
Next to that I placed the SWR meter attached to the output of the TM-D710A. On top, an old Bearcat handheld scanner to listen to the frequency of my EchoIRLP node. Next to that, the actual EchoIRLP node and a Pi-Star. Both of these devices require 5v power. To avoid as many wall warts as possible, they are connected to a 12v to 5v transformer that uses a PowerPole connection (Powerwerx Quick Charge 75W USB Device Charger).
The computer can be powered by 12v and the Davis weather panel uses 5v. I may be moving both of these over to the the station 12v power supply to avoid having their wall warts in the shack.
Mounted under the bottom shelf is the TM-D710A and an old Radio Shack speaker. Next to those, also mounted to the bottom of the shelf is a 8-port network switch. I try to limit WiFi in the shack and hardwire network connections where possible. The network switch also takes 5v and is a candidate to transition away from a wall wart.
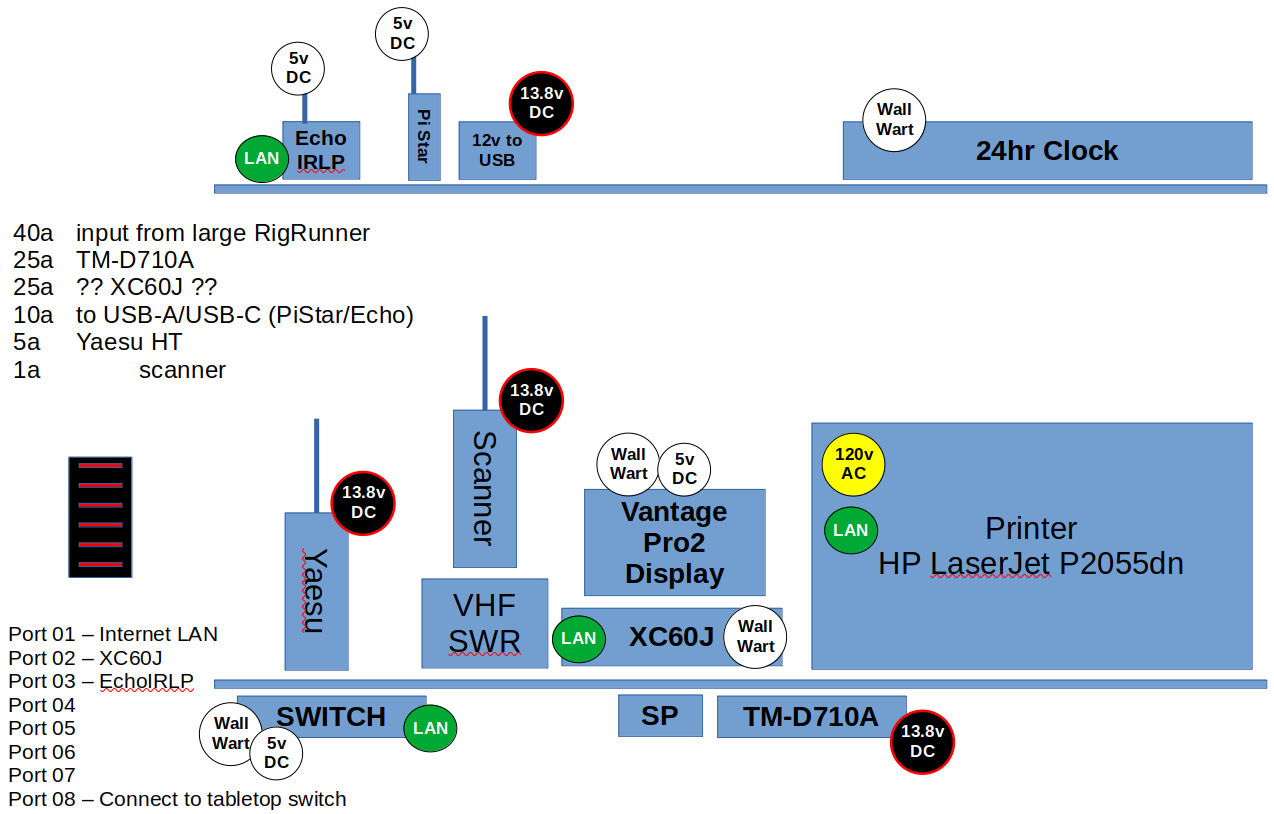
On the top shelf I have an interesting looking 24 hour clock that I purchased from ThinkGeek.com way back when. It uses a wall wart as well, but I have not checked the voltage. I also placed my DXCC and WAS awards on the top shelf.
The shelving unit has three connections: a power strip connected to the UPS (located under the desk), a PowerPole patch cable connecting the small RigRunner that supports the shelf and the primary RigRunner on the main table, and CAT5 cable run in from the house’s primary switch.
With the shelving unit squared away, I started moving in the desk components, starting with the supports. Individually, they easily wheeled in but I needed help to maneuver in the solid core door/tabletop. Once that was in place, I attached 2x 2x4s to the top and bottom of the backside of the desk supports to help with keeping everything together when moving it around the hamshack. The next step was driving four long wood screws through the top 2×4 into the bottom of the tabletop. The desk, as a unit, moved easily on its casters.
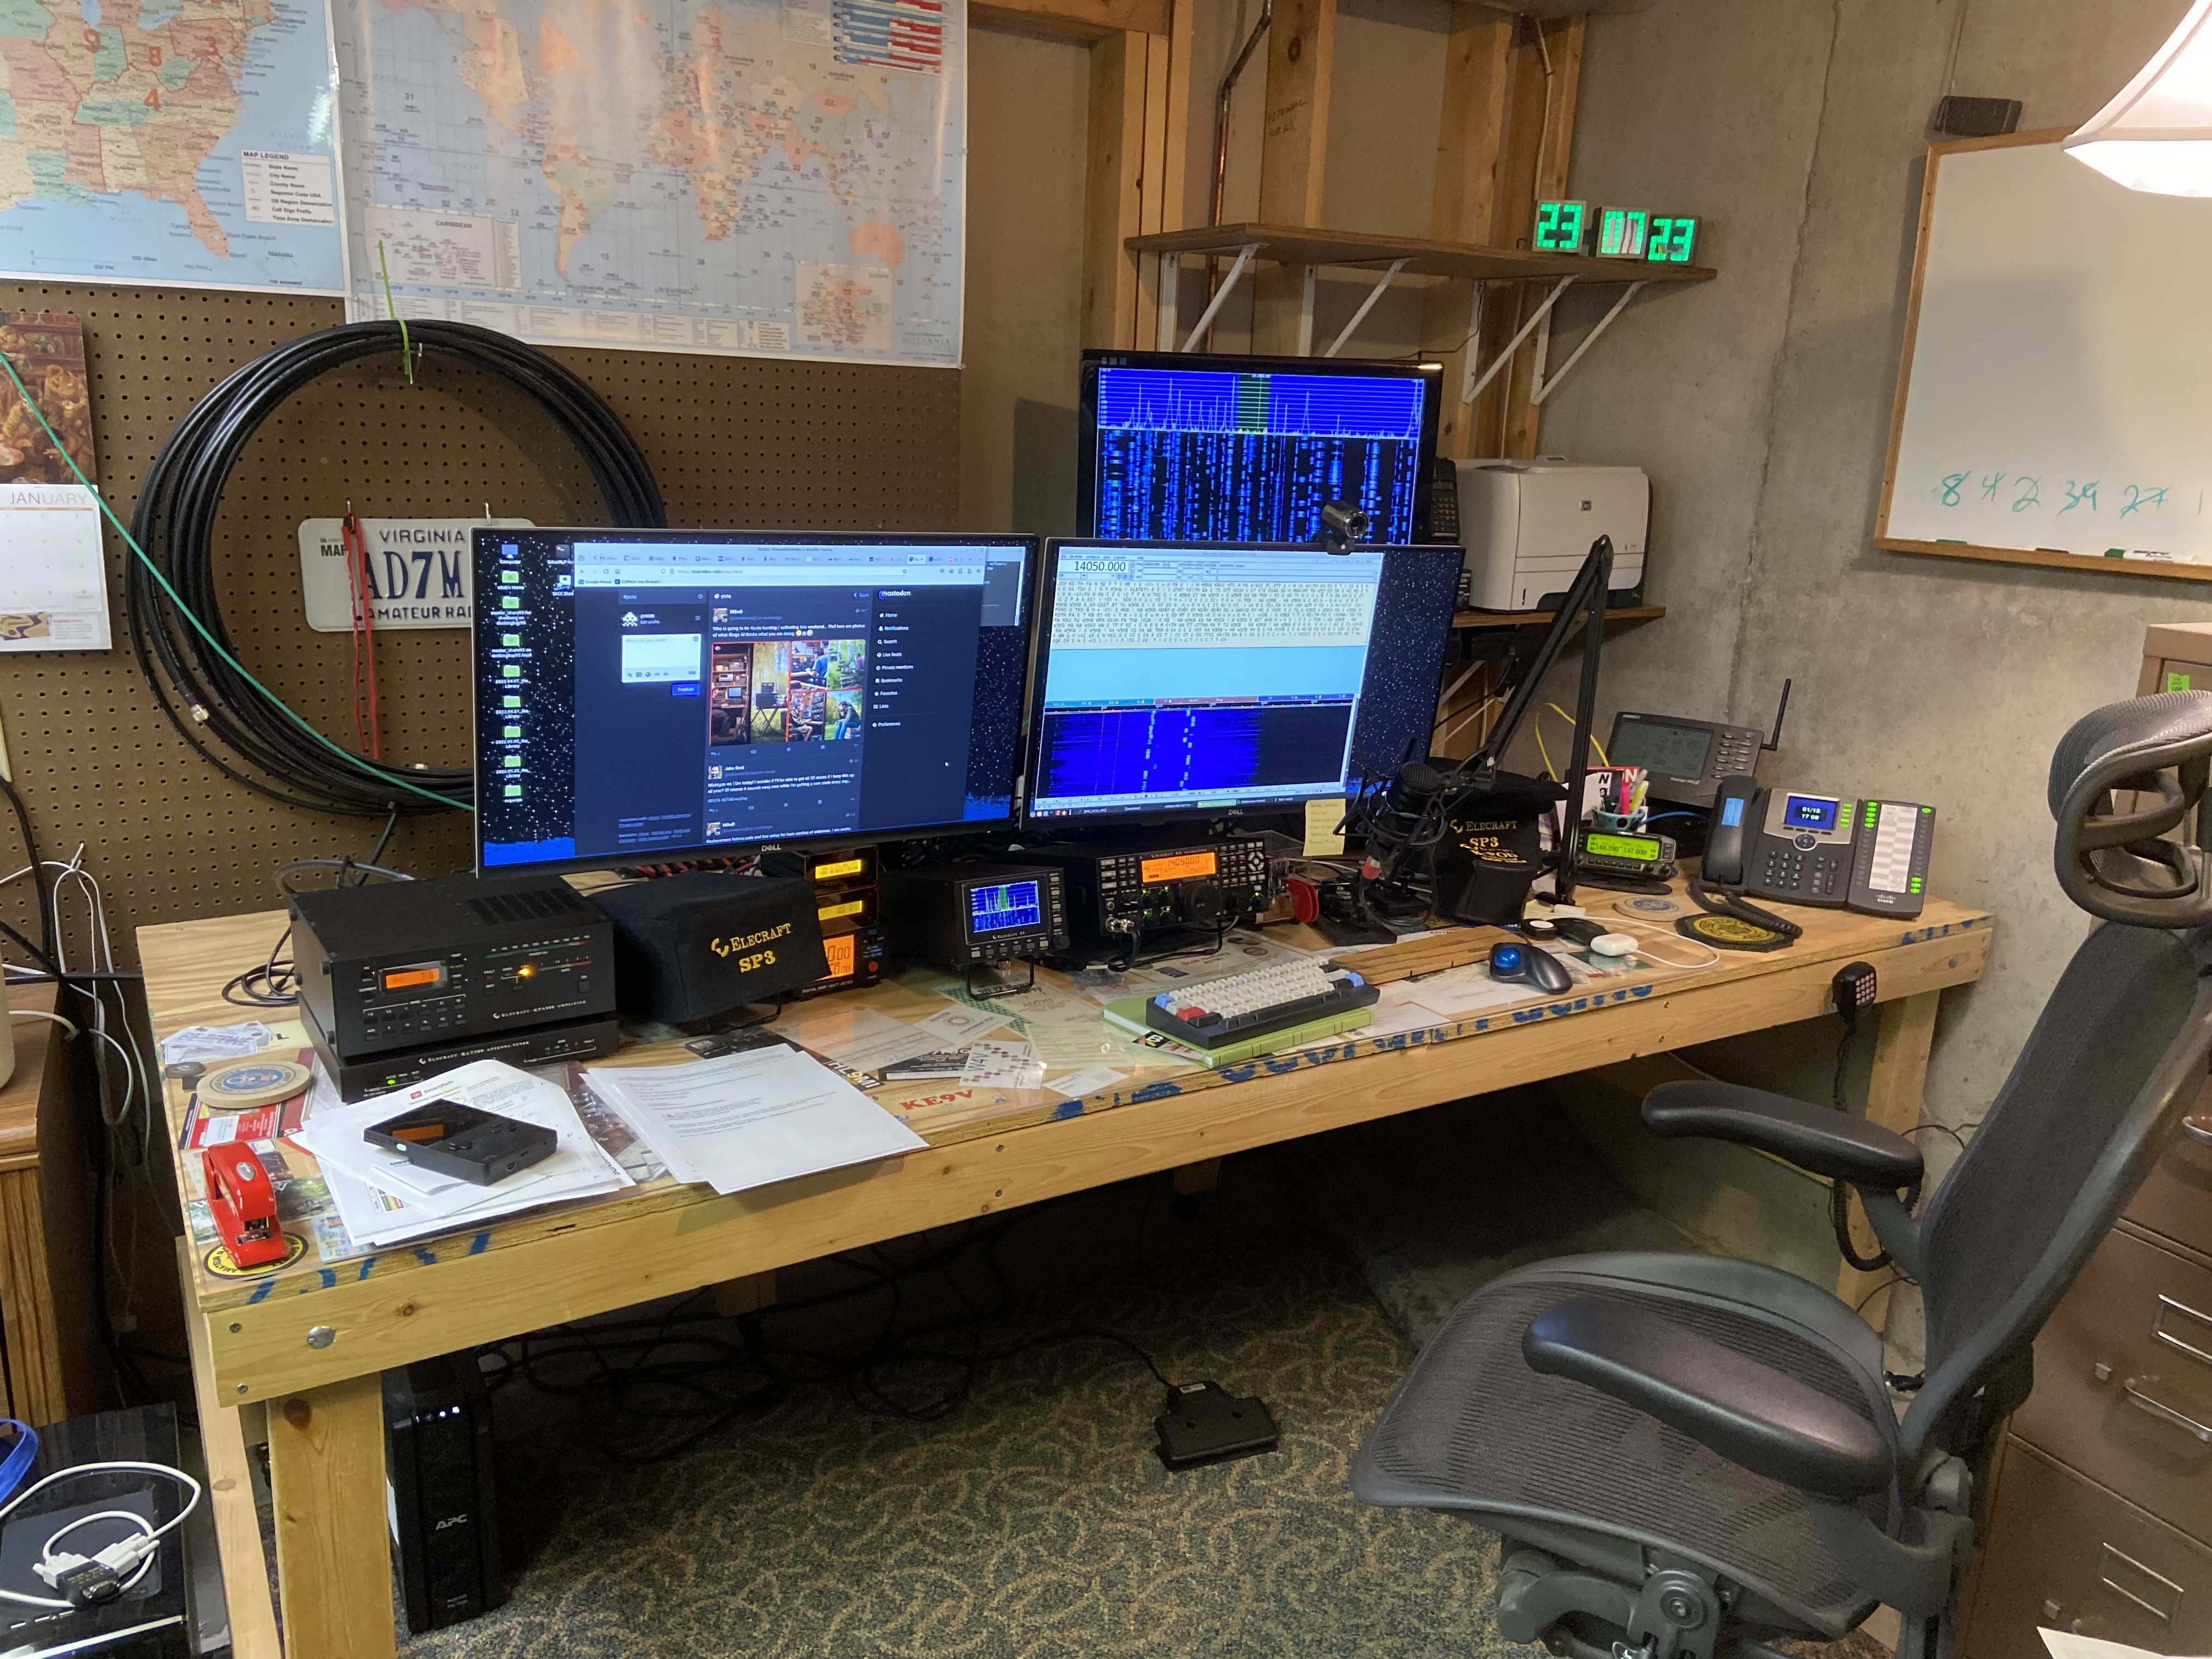
Next I secured the monitor arms to the tabletop, followed by the monitors themselves. I started running the power and monitor cables through the arms and it became apparent that I would need to get longer monitor cables for the DisplayPort. But the arms themselves offered a great way to manage the cables and decrease some of the table spaghetti. Each monitor arm was near a table pass thru so I could route the cables to where they needed to go.
Setting up the radio equipment on the table was straight forward. I realized I would need an extension cable for the mic boom. After I got all the proper sized cables, everything fell into place. It did take a long time to get all the network cables run and the monitor cables connected to the computers.
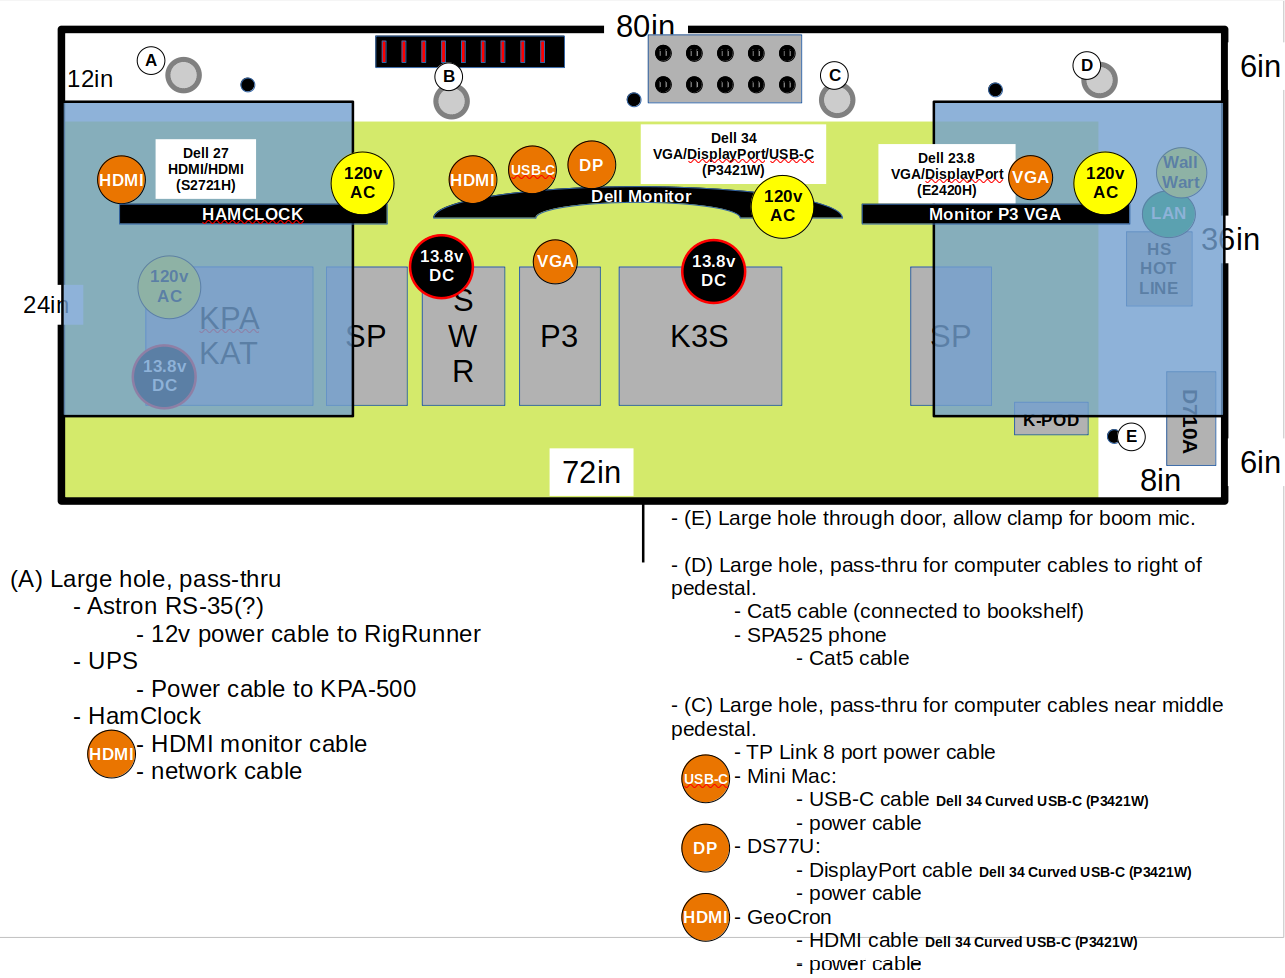
The HamClock (in the photograph below on the left monitor) came up without issue and is a great asset in the shack. The Panadapter monitor also worked. The Dell 34 in the middle allowed me to switch between both the hamshack linux box and the Mac Mini. The Elecraft K-Line came up and worked just as well as ever. I brought the TM-D710A and Xastir WX beacon up as well.
The second UPS arrived, identical to the first. The new UPS handles everything on the shelves: TM-D710A and Xastir-based APRS linux box. If there is a power hit, weather data should continue to go out for a while. The older UPS handles the two desk computers, the monitors, and the amp – less critical items. I also just replaced the battery in this older UPS. The other luxury of the UPS is protection against power surges.
Remaining issues and to dos:
- The USB-C/Thunderbolt video connection between the Mac Mini and the Dell 34 is not recognized by the monitor after a reboot until I reseat the USB-C/Thunderbolt cable. This is annoying and am not sure why this is happening. It does not happen when the connection is HDMI.
- For the Dell 34’s HDMI connection I am going to attach the GeoChron. I don’t think the GeoChron brings much operational value to the hamshack… but it looks cool. I considered getting a much larger 4K TV for the back wall to be used for the GeoChron, but I will keep my maps for now. I may switch on the GeoChron when showing off the hamshack.
- Cable labels. I had intended to use my label maker and clear shrink tubing to label each end of the cables and cords, but ended up delaying. I have the shrink tubing. I have a label maker. This is on the to do list.
- I need a distro box to swap out straight keys.
- The lights above the desk needed to be fixed.